If you’re using Ubuntu VM’s inside of GNS3, you’re probably sick of using a VNC client to access its command line.
The first big drawback to using VNC is that you can’t (or at least it’s not immediately obvious how to) paste text or commands you’ve found into the terminal. You have to retype everything, which is a real bummer.
The second big drawback is that a VNC session can’t be automated (or at least I don’t know of a good tool to do that). Since VNC is like RDP in that the session is visual, a human being or really advanced AI is required to interact with the session.
Having access to a VM in GNS3 via telnet to its terminal is a real benefit. You can set it up pretty quickly in Ubuntu 20.04. Full disclosure – this method only gets you access after the device has booted and arrived at the login prompt. There is a way to allow access earlier than that so the boot process can be viewed, I just haven’t gotten to it yet.
Set your VM to not be “linked base”
One mistake I often make in GNS3 is forgetting to make my VM not a “linked base” when I want to make permanent changes. A linked base is basically a clone of your VM. Any changes you make, files you download or programs you install will be blown away when you delete the device from the GNS3 canvas. To disable this functionality temporarily to make permanent changes, go to the device in the left pane and click “configure template”. On the advanced tab, uncheck “Use as a linked base VM”:
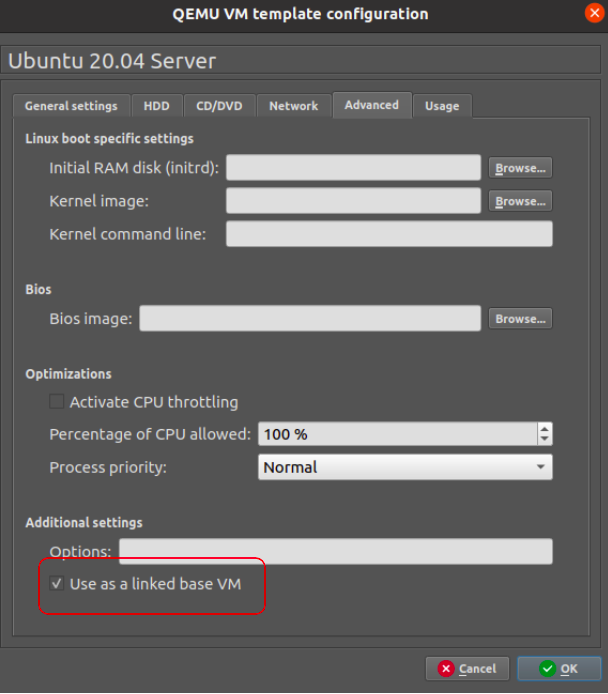
When you are done configuring the telnet capability, you can recheck this box. All linked base VM’s you drag out afterwards will have the telnet capability.
Create the ttyS0.service
You first need to create a systemd service for serial access. We need to create a file called ttyS0.service in the /lib/systemd/system/ directory:
vi /lib/systemd/system/ttyS0.service
The file contents should look like this:
[Unit]
Description=Serial Console Service

[Service]
ExecStart=/sbin/getty -L 115200 ttyS0 vt102
Restart=always

[Install]
WantedBy=multi-user.target
getty is program that manages tty sessions, physical or virtual terminals. It will run the login prompt when a connection is detected. 115200 is the baud rate, ttyS0 is a device file that points to the current terminal, and vt102 is the terminal emulator.
Load the service in systemd
Just a few commands will load the new service in systemd, and the script will run on boot to activate your serial device and allow telnet. Run these commands:
#Make file executable
chmod 755 ttyS0.service

#Reload systemd
systemctl daemon-reload

#Enable the service
systemctl enable ttyS0

#Start the service
systemctl start ttyS0
Your service is good to go!
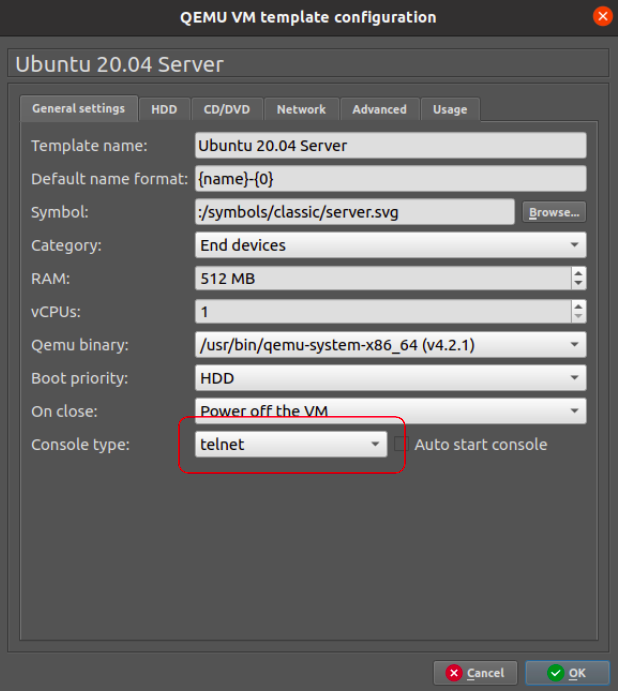
Change the console type to telnet
You need to first shut down your VM so you can change the console type. Once it’s shutdown, you can configure the device on the canvas, or the template in the pane to the left, or both. The template will make changes for all VM’s dragged onto the canvas in the figure. Either way, configure the node by right clicking on it, and clicking on “configure” or “configure template”. At the very bottom, you should see a dropdown for “console type”. Change it to “telnet”:
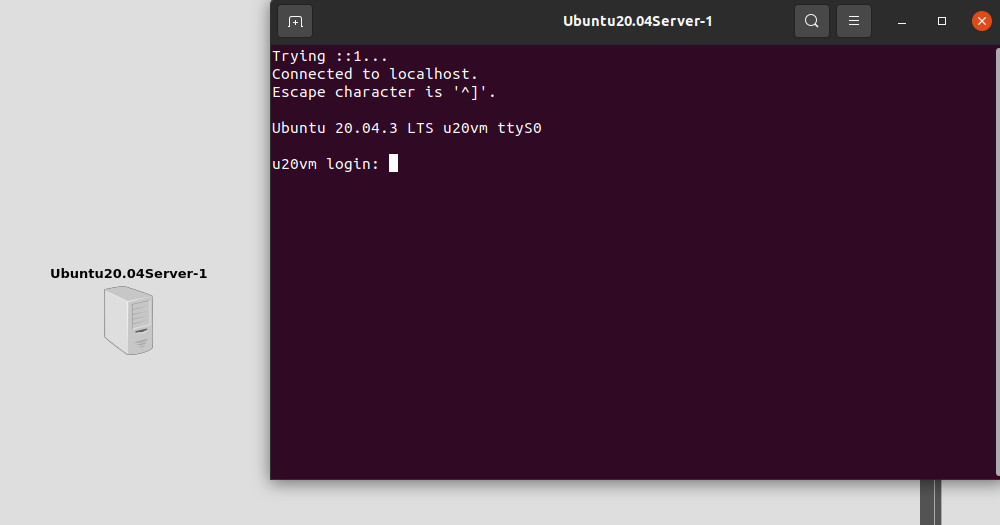
Log in via telnet!
Just double-click on your VM. You won’t see any output on the telnet window while the VM is booting up because the service hasn’t fired yet. But when it does, you should see the login prompt:
Bonus tip – turn off dhcp in netplan
I had to turn off dhcp in Ubuntu’s netplan network configuration tool to get it to stop hanging at boot. There should be a yaml file in /etc/netplan/ (the yaml file name might differ per system) where you can turn it off. My netplan config looks like this:
network:
  ethernets:
    ens3:
      dhcp4: false
      optional: yes
  version: 2
Hope that helps!