Here at Question Computer we do a fair amount of lab creation, especially with Linux and networking. I’d like to share my essential commands that I use for setting up a basic IP network since in most of my articles I assume that part is already set up.
Stand aside, ifconfig (it’s been deprecated). iproute2 is the official utility to interact with the Netlink Linux kernel interface, which provides a way for the Linux kernel’s networking stack to be configured. That’s a bit of a long-winded way of saying if you want an IP address, use iproute2. iproute2 is split up into a number of different child commands, each for a different part of the network stack, such as ip addresses, interfaces, routing, etc.
Keep in mind – iproute2 manages Linux network configurations on the fly. If you want your configurations to survive a reboot, you’ll either need to write a startup script or you can use the Ubuntu tool for managing network configs – netplan.
Topology
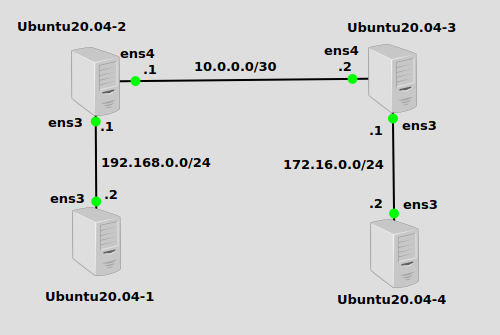
We’ll be working with a basic topology that will illustrate the different commands we’ll be using here. By the end of the lab, we should have IP connectivity between all nodes. Ubuntu20.04-2 and Ubuntu20.04-3 will be serving as routers by forwarding and have it enabled in their /etc/sysctl.conf files.
1. ip link
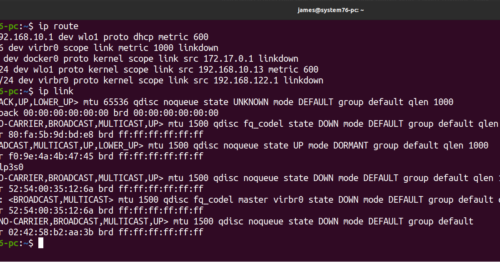
We’ll start with Ubuntu20.04-1 at the bottom left. Before we can even get to assigning IP addresses, we need to know what the interfaces are called, and to turn them on. The ip link command will show us what they are:
ip link
---

1: lo: <LOOPBACK,UP,LOWER_UP> mtu 65536 qdisc noqueue state UNKNOWN mode DEFAULT group default qlen 1000
    link/loopback 00:00:00:00:00:00 brd 00:00:00:00:00:00
2: ens3: <BROADCAST,MULTICAST,UP,LOWER_UP> mtu 1500 qdisc fq_codel state UP mode DEFAULT group default qlen 1000
    link/ether 0c:96:94:ff:00:00 brd ff:ff:ff:ff:ff:ff
We can ignore the “lo” loopback interface, the one that is connected to the actual network is “ens3”. Let’s enable it:
ip link set ens3 up
Now that it’s enabled, we can assign an IP address to this interface. This command will need to be run on all interfaces on all nodes. I won’t show that, as it’s a bit repetitive. It can be run either before or after an IP address is assigned, but I like to do it before.
2. ip address
To assign an IP address to Ubuntu20.04-1’s ens3 interface, this command will do it:
ip address add 192.168.0.2/24 dev ens3
Hopefully the arguments there are pretty self-explanatory. “add” means we’re adding an IP address, and “dev” just means we’re assigning the address to the interface that comes after it.
Now that we know how to assign an IP address, the rest of the nodes are easy.
Ubuntu20.04-2:
ip address add 192.168.0.1/24 dev ens3
ip address add 10.0.0.1/30 dev ens4
Ubuntu20.04-3:
ip address add 172.16.0.1/24 dev ens3
ip address add 10.0.0.2/30 dev ens4
Ubuntu20.04-4:
ip address add 172.16.0.2/24 dev ens3
3. ip route
The way to manage routes with iproute2 is with the ip route command.
First, on Ubuntu20.04-1, we’ll need to add a default route which is the most common basic configuration for an endpoint node. This command will add it:
ip route add default via 192.168.0.1
The via parameter allows you to specify where to send traffic that is being sent using the default route. In this case, it’s the Ubuntu router at the top left, Ubuntu20.04-2.
Ubuntu20.04-2 is directly connected to 192.168.0.0/24 and 10.0.0.0/30 with interfaces ens3 and ens4, but it does not know about 172.16.0.0/24. Adding a static route for that subnet pointing to 10.0.0.2 (the other Ubuntu router at the top right) will allow traffic to flow:
ip route add 172.16.0.0/24 via 10.0.0.2
A similar but mirror image of that command can be run on Ubuntu20.04-3:
ip route add 192.168.0.0/24 via 10.0.0.1
And finally we’ll add another default to Ubuntu20.04-4:
ip route add default via 172.16.0.1
All connectivity should be in place!
Verify
Let’s try to ping from Ubuntu20.04-1 to Ubuntu20.04-4, all the way across the environment.
From Ubuntu20.04-1:
ping 172.16.0.2
---

PING 172.16.0.2 (172.16.0.2) 56(84) bytes of data.
64 bytes from 172.16.0.2: icmp_seq=1 ttl=62 time=1.97 ms
It works! Ping is a simple but handy tool. Always remember that when you get a reply, it means not only did traffic make it to its destination, but it came back too.