Background
For many years, Linux users used the old familiar network configuration text file located (usually) at ‘/etc/network/interfaces’ to configure IP addresses, DNS settings, gateway settings, and the like. It was even possible to create a virtual (read: loopback) interface with no associated physical interface using this file. While desktop versions of Ubuntu have used Network Manager for a long time to make things easier from a GUI, the CLI-only nature of an Ubuntu Server doesn’t need all the overhead of Network Manager.
Recent versions of Ubuntu Server (starting with 18.04) have moved to a new network configuration method, using a software package called “Netplan” developed by Ubuntu’s maintainer, Canonical. I’ve read the Ubuntu developers’ reasoning for making this switch, and to make a long story short, their decision was…. justified. The old method had many shortcomings. And while Netplan has a cool new and modern feel including configuration from a YAML file, the one thing that’s missing from it (best I can tell) is a way to create a loopback adapter. I scoured the Intertubes looking for a way to create one via Netplan but finally came to the conclusion that it doesn’t really have one. Others in the Ubuntu community seemed to agree but I could find no official documentation… if you know of some please leave a comment or send me an email, I’d love to know. I’ll update this article if loopback functionality is added to Netplan.
In any case, I’ve been using a method to create loopback adapters on Ubuntu Server and Desktop well before Netplan came along, simply because it’s the way I learned and it seems to work no matter what distribution or version I’m using. Loopback adapters are useful for all sorts of stuff in networking. You can create one, give it an IP address and advertise it in a routing protocol like OSPF, for example. Unlike physical interfaces, loopback adapters are much, much less likely to “go down”.
Topology
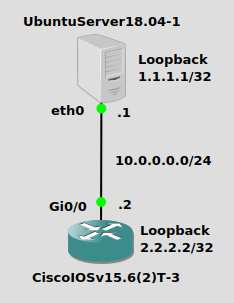
Nothing mind-blowing, we have a simple 10.0.0.0/24 network here. My Ubuntu Server 18.04 box will have a physical IP of 10.0.0.1/24 and a loopback adapter with IP address of 1.1.1.1/32. The Cisco IOSv box will have a physical address of 10.0.0.2/24 and a loopback adapter with IP address 2.2.2.2/32. Remember, neither of these boxes “knows” about the other’s loopack address, so we’ll have to do some sort of routing. Static routes are a simple solution, but most networking peeps are going to be looking to do a routing protocol. I’ll do OSPF just for kicks.
Configuration
Since there’s no external software or packages to install, I’ll jump right into configuration. This blog post assumes you have IPv4 routing enabled on both the Ubuntu Server and the Cisco router, and you have configured the network interfaces for 10.0.0.0/24.
Ubuntu18.04-1
On Ubuntu 18.04, you can add a “dummy” adapter with a single command like this:
$ip link add name loop1 type dummy
Then turn it on and give it an IP address:
$ip link set loop1 up
$ip addr add 1.1.1.1/32 dev loop1
And you’re done. Keep in mind these commands don’t stick when you reboot. You can put these commands in a startup script, I’ll cover that in a another post.
CiscoIOSv15.6(2)T-3
Creating a loopback adapter on a Cisco IOS is simple as well, although I will say it would be nice if it supported CIDR notation (like other Cisco OS’s). Go into config mode and issue these commands:
Router(config)#int loop1
Router(config-if)#ip add 2.2.2.2 255.255.255.255
Verification
Ubuntu18.04-1
A good old fashion ping from the Ubuntu box to its own loopback adapter will tell you if it’s up:
$ping 1.1.1.1
64 bytes from 1.1.1.1: icmp_seq=1 ttl=64 time=0.038 ms
64 bytes from 1.1.1.1: icmp_seq=2 ttl=64 time=0.049 ms
The “ip route” command won’t show your /32, so try issuing the “ip addr show” command. To just show your loop1 adapter, add that on the end:
$ip addr show loop1
4: loop1: <BROADCAST,NOARP,UP,LOWER_UP> mtu 1500 qdisc noqueue state UNKNOWN group default qlen 1000
    link/ether de:9d:7c:37:7a:c2 brd ff:ff:ff:ff:ff:ff
    inet 1.1.1.1/32 scope global loop1
       valid_lft forever preferred_lft forever
    inet6 fe80::dc9d:7cff:fe37:7ac2/64 scope link
       valid_lft forever preferred_lft forever
CiscoIOSv15.6(2)T-3
From enabled mode you can just issue “show ip int brief”:
Router#show ip int bri
Interface                  IP-Address      OK? Method Status                Protocol
GigabitEthernet0/0         10.0.0.2        YES manual up                    up
GigabitEthernet0/1         unassigned      YES NVRAM  administratively down down
GigabitEthernet0/2         unassigned      YES NVRAM  administratively down down
GigabitEthernet0/3         unassigned      YES NVRAM  administratively down down
Loopback1                  2.2.2.2         YES manual up                    up
Optional – Static Routing
A static route is a quick and easy way (but not very scalable) to make the loopback adapters reachable across the network.
Ubuntu18.04-1
On Ubuntu, just issue a single command to add a static route to reach the Cisco router’s loopback. Make :
$ip route add 2.2.2.2/32 via 10.0.0.2
You can now ping it:
ping 2.2.2.2
64 bytes from 2.2.2.2: icmp_seq=1 ttl=255 time=1.36 ms
64 bytes from 2.2.2.2: icmp_seq=2 ttl=255 time=1.72 ms
CiscoIOSv15.6(2)T-3
It’s also a single command on the Cisco router’s configuration mode to add a static route to reach the Ubuntu box’s loopback adapter. You should be able to ping after adding it:
Router(config)#ip route 1.1.1.1 255.255.255.255 10.0.0.1
Router(config)#end
Router#ping 1.1.1.1
Type escape sequence to abort.
Sending 5, 100-byte ICMP Echos to 1.1.1.1, timeout is 2 seconds:
!!!!!
Success rate is 100 percent (5/5), round-trip min/avg/max = 1/1/1 ms
Optional – OSPF Routing
I have removed the static routes, so routing is no longer in place.
Ubuntu18.04-1
For setting up OSPF routing on Ubuntu, please see my post on that. It’s not too bad, just some commands to install Cumulus Linux Free Range Routing (FRR) from the Canonical Snap Store. Assuming you got that done, jump into the FRR CLI:
$/snap/bin/frr.vtysh
frr#conf t
frr(config)#router ospf
frr(config-router)#network 10.0.0.0/24 area 0
frr(config-router)#network 1.1.1.1/32 area 0
frr(config-router)#end
frr#show ip route
O   1.1.1.1/32 [110/10] via 0.0.0.0, loop1 onlink, 00:02:16
C>* 1.1.1.1/32 is directly connected, loop1, 00:19:40
O>* 2.2.2.2/32 [110/101] via 10.0.0.2, eth0, 00:00:08
O   10.0.0.0/24 [110/100] is directly connected, eth0, 00:03:14
C>* 10.0.0.0/24 is directly connected, eth0, 00:20:25
You’ll get the above route output as soon as the OSPF neighborship is up. You should be able to ping the Cisco’s loopback at 2.2.2.2.
CiscoIOSv15.6(2)T-3
On a Cisco IOS router, OSPF is of course already installed, firing it up is just a couple commands in config mode. Once again, CIDR notation would be nice. Does the world really need wildcard masks? They probably keep it that way to support automated systems that use it, but they could add CIDR notation support. Just sayin’.
Router(config)#router ospf 1
Router(config-router)#network 10.0.0.0 0.0.0.255 area 0
Router(config-router)#network 2.2.2.2 0.0.0.0 area 0
Router(config-router)#end
Router#show ip route
      1.0.0.0/32 is subnetted, 1 subnets
O        1.1.1.1 [110/11] via 10.0.0.1, 00:00:35, GigabitEthernet0/0
      2.0.0.0/32 is subnetted, 1 subnets
C        2.2.2.2 is directly connected, Loopback1
      10.0.0.0/8 is variably subnetted, 2 subnets, 2 masks
C        10.0.0.0/24 is directly connected, GigabitEthernet0/0
L        10.0.0.2/32 is directly connected, GigabitEthernet0/0
You should now be able to ping 2.2.2.2 from the Ubuntu box, and ping 1.1.1.1 from the Cisco router.
As I mentioned earlier, your “ip” commands won’t survive a reboot.