OpenSSL is probably the most widely used cryptographic tool in existence. Deployed on millions of machines, from cloud servers and containers to small embedded devices like network routers, it performs many functions to secure communications between devices. Security in computing and networking is a gigantic topic. So gigantic in fact, that no single blog post can come even close covering everything. To keep things simple, I’ll narrow things to just getting our own environment created, including a “certificate authority” (CA), a web server and a web client. These days, SSL is synonymous with TLS. TLS is just the name of the newer versions of the SSL protocol.
Topology
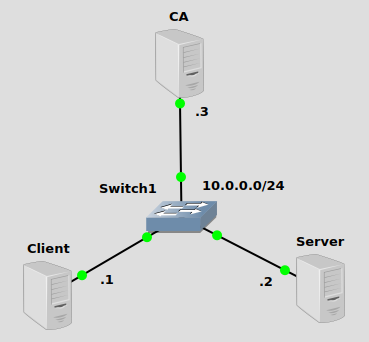
The network topology in this post isn’t very important, we’re going to be looking at how a certificate authority works with SSL encryption. But I’ve created a basic IP subnet 10.0.0.0/24 so we can watch the SSL traffic flow in Wireshark. All three machines are running Ubuntu 20.04. All SSL-related functions will be performed with OpenSSL.
A (very) basic explanation of a certificate authority
Certificate authorities, SSL, and Public Key Infrastructure (PKI) are a complex topic. To explain the whole thing would take lots of different explanations to break down each piece of the bigger picture and explain the part it plays. So to avoid having a gigantic explanation here, I’m going to sum up the function of a CA with a single sentence:
“A certificate authority provides a way for computers to verify that other computers they communicate with are in fact the domain name (i.e., example.com) they claim to be, and not a fraud.”
I hope that helps. I’ll take a crack at explaining PKI in another post.
Create the CA
A CA can be created with OpenSSL with a couple quick commands. When this process is complete, we will have two files, a private key and a digital certificate. First create a private key on our CA Ubuntu machine (at 10.0.0.3):
openssl genrsa -aes128 -out james_ca.key 2048
Now we’ll create a certificate. The private key’s corresponding public key will be on this certificate. We’ll be asked some questions after issuing the command, most of them are not important. The Common Name field should ideally be unique:
openssl req -x509 -new -nodes -key james_ca.key -sha256 -days 365 -out james_ca.pem
----
Country Name (2 letter code) [AU]:US
State or Province Name (full name) [Some-State]:Idaho
Locality Name (eg, city) []:Boise
Organization Name (eg, company) [Internet Widgits Pty Ltd]:James
Organizational Unit Name (eg, section) []:James
Common Name (e.g. server FQDN or YOUR name) []:James_CA
Email Address []:someone@example.com
Our server is now a CA! The world’s CA’s are considered “trusted” because web browsers everywhere come with their certificates pre-installed. The CA we just created is trusted by no one and pre-installed in nothing, but we can get our Ubuntu client machine to trust the CA by manually loading the CA certificate into the client’s certificate store.
Load the CA certificate on the client
We’ll use secure copy (scp) which runs over SSH to copy the CA certificate to the Ubuntu client. The command looks like this:
scp james@10.0.0.3:james_ca.pem .

james_ca.pem                                  100% 1456   605.0KB/s   00:00
The first line above is the command, the second is the output. Now we need to add this to Ubuntu’s trusted certificate store. A couple commands will do the trick.
cp james_ca.pem /usr/local/share/ca-certificates/james_ca.crt
update-ca-certificates

Updating certificates in /etc/ssl/certs...
1 added, 0 removed; done.
Running hooks in /etc/ca-certificates/update.d...
done.
The first two lines are the commands, the rest is output. We’ve copied james_ca.pem (and changed its extension to .crt) to /usr/local/share/ca-certificates, which is where Ubuntu keeps certificates that it trusts. The update-ca-certificates command loads the new certificate for use in applications, like a web client or browser.
We have done manually what the world’s web browsers have built-in. We have loaded the certificate of a CA we trust. Now any other certificate presented to this client will be trusted if it has been signed by the CA.
Create a signing request on the server
Now we need to create what is called a “signing request”, which is actually just another file in a specific format. We take this signing request file to the CA, which it will use to create a signed certificate, which can be returned to the server and loaded into nginx web server for use. We’ll be asked the same set of questions this time since a certificate is going to be created. The important field is the Common Name, which is usually the server’s domain name, but in this simple topology it’s the IP address (since I haven’t set up DNS) that the client will use to access the nginx web server. The signing request is created with SSL like this:
openssl req -newkey rsa:2048 -keyout private.key -out james.csr

Generating a RSA private key
.................+++++
..............................................................................................+++++
writing new private key to 'private.key'
Enter PEM pass phrase:
Verifying - Enter PEM pass phrase:
-----
You are about to be asked to enter information that will be incorporated
into your certificate request.
What you are about to enter is what is called a Distinguished Name or a DN.
There are quite a few fields but you can leave some blank
For some fields there will be a default value,
If you enter '.', the field will be left blank.
-----
Country Name (2 letter code) [AU]:US
State or Province Name (full name) [Some-State]:Idaho
Locality Name (eg, city) []:Boise
Organization Name (eg, company) [Internet Widgits Pty Ltd]:James
Organizational Unit Name (eg, section) []:James
Common Name (e.g. server FQDN or YOUR name) []:10.0.0.2
Email Address []:someone@example.com

Please enter the following 'extra' attributes
to be sent with your certificate request
A challenge password []:
An optional company name []:
The first line is the command, the rest is output. The passphrase you use for the private key will have to be removed later, I’ll show you how at that time.
Now we can take the file james.csr to the CA and produce a signed certificate.
Load the signing request on the CA
Let’s again use secure copy to bring the signing request file to the CA. On the CA’s cli:
scp james@10.0.0.2:james.csr .
The signing request file is now on the CA. We can create a certificated (server.pem) signed with the CA’s private key like this:
openssl x509 -req -in james.csr -days 365 -CA james_ca.pem -CAkey james_ca.key -out server.pem
Just a quick recap of the different files in use here:
james.csris the signing request from the serverjames_ca.pemis the CA’s certificatejames_ca.keyis the CA’s private keyserver.pemis the CA-signed certificate that we can now return to the server for use in nginx
Great! We’ve got a freshly signed certificate ready to go. Let’s copy it to the server and load it into nginx.
Load the signed certificate into nginx
Let’s use scp again to copy server.pem to the server. On the server’s cli:
scp james@10.0.0.3:server.pem .
Now we have the signed certificate on our server. By the way, nginx can be quickly installed like this:
apt-get install nginx
And check it’s working with systemctl status nginx:

As I said earlier, we’ll need to remove the passphrase encryption from the server’s private key before it can be used in nginx. It’s one command, like this:
openssl rsa -in private.key -out private_unencrypted.pem
Now that the private key has been unencrypted into a new file called private_unencrypted.pem, it can be used in the nginx config file. The default nginx config is in /etc/nginx/sites-available/default. I added these lines, they’ll be a bit different for yours if the folders and/or files are differently named:
listen 443 ssl default_server;
ssl_certificate /home/james/server.pem;
ssl_certificate_key /home/james/private_unencrypted.pem;
server_name 10.0.0.2;
Restart nginx:
systemctl restart nginx
If you don’t get any errors, you are good to go!
Verify SSL is working from the client
There are a lot of commands to get the certificate presented from the server, view it, verify it, etc. But for now, we can just validate the SSL connection. You can do that with curl really easy from the client:
curl https://10.0.0.2

<!DOCTYPE html>
<html>
<head>
<title>Welcome to nginx!</title>

.... omitted for brevity
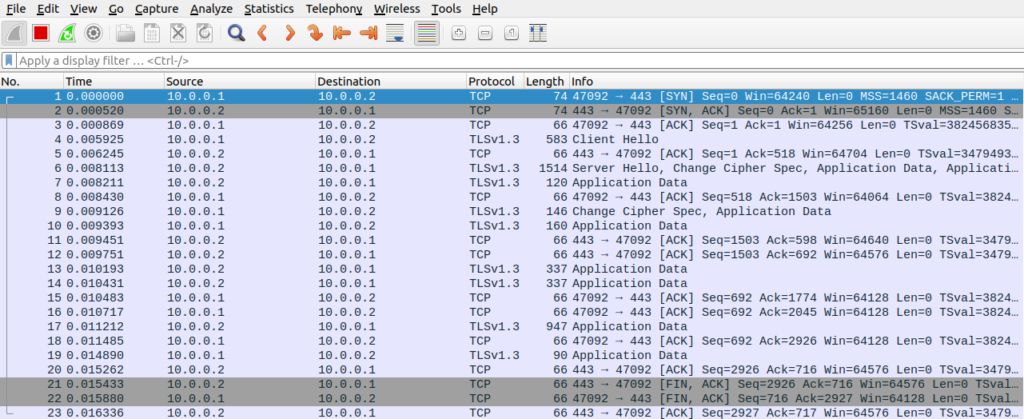
We can see we properly got an HTML document back from the server. We can also see it in Wireshark if you capture traffic going to and from the client and server. We can see the entire SSL (TLS) handshake go through without any errors:
Ironically, the CA has not had its own certificate installed in its certificate store (unless you did that on your own). So we can actually see using curl from the command line of the CA machine what it would look like to try to access the server without the certificate installed. From the CA:
curl https://10.0.0.2

curl: (60) SSL certificate problem: unable to get local issuer certificate
More details here: https://curl.haxx.se/docs/sslcerts.html

curl failed to verify the legitimacy of the server and therefore could not
establish a secure connection to it. To learn more about this situation and
how to fix it, please visit the web page mentioned above.
This is the command line equivalent of this screen in your browser:

Since the CA’s certificate hasn’t been installed in it’s certificate store, the connection to the server at 10.0.0.2 can’t be verified and so you get a nasty message.
This was a long one but I hope it helped you understand keys, certificates and certificate authorities! It sure helped me!