IPsec is a cool tool for encrypting connections between network nodes, usually over the Internet (but not always). There are many different ways to configure an IPsec tunnel. Many tunnels use a policy-based approach which means the traffic that is sent through the tunnel is pre-defined using a “policy” that is part of the configuration. That doesn’t always work, you may need to dynamically change what traffic goes through using a routing protocol like OSPF or EIGRP without having to bring the tunnel down and reconfigure it . Thus there is another option, a “route-based” tunnel.
There are two different methods for creating a route-based IPsec tunnel, the first using GRE, which inserts a second GRE IP header into packets going into the tunnel. The second is VTI, which operates in a similar manner to GRE but under the hood it’s quite a different implementation.
VTI was originally way to save IP space on point-to-point links in the early networking days before subnetting. It was adapted as a way to assign routes to an IPsec tunnel. Part of its legacy is a “numbered” or “unnumbered” mode. Originally, VTI could inherit an IP from another interface and save IP address space. This unnumbered mode is pretty strange, so today we’ll take a look at numbered mode to keep things familiar.
Topology
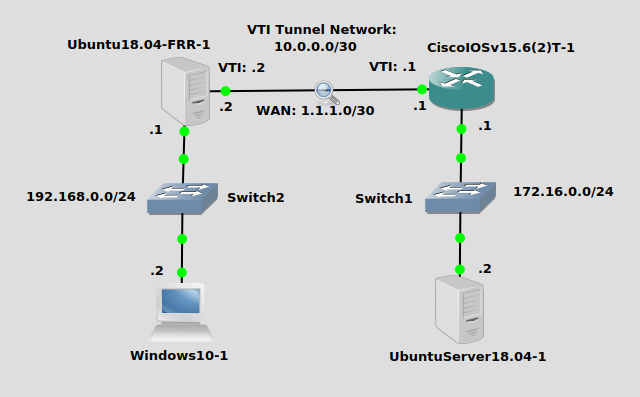
Pretty simple, we’re trying to get the Window10 box at the bottom left to ping the Ubuntu Server 18.04 at the bottom right to ping each other. We’ll configure a tunnel between the Ubuntu box at the top left and the Cisco IOSv router at the top right. The underlying 1.1.1.0/30 network serves to look like a WAN network, while the network inside the VTI tunnel will be 10.0.0.0/30.
Installation
Ubuntu18.04-FRR-1
Strongswan on Ubuntu 18.04 is pretty easy with apt-get:
apt-get install strongswan
Configuration
Ubuntu18.04-FRR-1
First you need to add a config to /etc/ipsec.conf, something that looks like this:
conn tunnel
        leftupdown=/usr/local/sbin/ipsec-notify.sh #run this script on start
        left=166.0.0.5
        leftsubnet=0.0.0.0/0 #all traffic
        right=166.0.0.1
        rightsubnet=0.0.0.0/0 #all traffic
        ike=aes256-sha2_256-modp1024!
        esp=aes-sha2_256!
        authby=secret
        auto=start
        keyexchange=ikev2
        mark=32 # only accepts packets with this mark
        type=transport
Then configure the PSK in /etc/ipsec.secrets:
1.1.1.2 1.1.1.1 : PSK '12345'
Then create the tunnel script that is referenced in the config. For me the file will be located at /home/james/ipsec-notify.sh:
ip link add vti0 type vti local 1.1.1.2 remote 1.1.1.1 key 32
ip link set vti0 up
ip addr add 10.0.0.2/30 dev vti0
ip lin set dev vti0 mtu 1400
Note the “key 32” in the first line above. That identifies what traffic strongswan should encrypt and corresponds to the “mark” in the strongswan config. It’s important.
Next you need to add a line for your VTI interface in /etc/sysctl.conf that looks like this to disable kernel policy lookups, this is a routed interface:
net.ipv4.conf.vti0.disable_policy=1
Finally, you need to tell Charon (Strongswan’s IKE daemon) to not handle routing. We’ll handle routing on our own. In /etc/strongswan.d/charon.conf, find this line:
install_routes = no
Make sure it’s set to no. Tell strongswan to restart and the tunnel should attempt a connection:
ipsec restart
CiscoIOSv15.6(2)T-1
My running-config is abbreviated, but it looks like this:
crypto ikev2 proposal james-proposal
 encryption aes-cbc-256
 integrity sha256
 group 2
!
crypto ikev2 policy james-policy
 proposal james-proposal
!
crypto ikev2 keyring james-ring
 peer remote-router-james
  address 1.1.1.2
  pre-shared-key 12345
!
crypto ikev2 profile james-profile
 match identity remote address 1.1.1.2 255.255.255.255
 authentication local pre-share
 authentication remote pre-share
 keyring local james-ring
!
crypto ipsec transform-set james-trans esp-aes esp-sha256-hmac
 mode transport
!
crypto ipsec profile james-protect-vti
 set transform-set james-trans
 set ikev2-profile james-profile
!
interface Tunnel0
 ip address 10.0.0.1 255.255.255.252
 ip mtu 1400
 tunnel source 1.1.1.1
 tunnel mode ipsec ipv4
 tunnel destination 1.1.1.2
 tunnel protection ipsec profile james-protect-vti
Static routing
Ubuntu18.04-FRR-1
Pretty simple, just add a route for 172.16.0.0/24 pointing to 10.0.0.1
ip route add 172.16.0.0/24 via 10.0.0.1
CiscoIOSv15.6(2)T-1
Simple here too:
ip route 192.168.0.0 255.255.255.0 10.0.0.2
Optional – EIGRP Routing
Remove those static routes and we’ll try a protocol to achieve the aforementioned dynamic routing.
Ubuntu18.04-FRR-1
Checkout my post on setting up EIGRP with Free Range Routing on Linux for the installation. Assuming you have that done, just log into the FRR shell on Ubuntu, it’s in /snap/bin, or just use the full path:
/snap/bin/frr.vtysh
Hello, this is FRRouting (version 7.2.1).
Copyright 1996-2005 Kunihiro Ishiguro, et al.
james#
james# conf t
james(config)# router eigrp 10
james(config-router)# network 192.168.0.0/24
james(config-router)# network 10.0.0.0/30
james(config-router)# end
james#
CiscoIOSv15.6(2)T-1
On a Cisco IOSv router, it’s pretty simple:
Router(config)#router eigrp 10
Router(config-router)#network 172.16.0.0 0.0.0.255
Router(config-router)#network 10.0.0.0 0.0.0.3
Router(config-router)#end
Verification
Ubuntu18.04-FRR-1
Verifying the tunnel on Ubuntu is done with “ipsec statusall”, although there are more specific commands. This will do since we only have one tunnel. I’ve abbreviated the output, but these lines say it all:
Security Associations (1 up, 0 connecting):
      tunnel[1]: ESTABLISHED 58 minutes ago, 1.1.1.2[1.1.1.2]...1.1.1.1[1.1.1.1]
      tunnel[1]: IKEv2 SPIs: 9a137e96ee332b6b_i* 1599c6291be65825_r, pre-shared key reauthentication in 110 minutes
      tunnel[1]: IKE proposal: AES_CBC_256/HMAC_SHA2_256_128/PRF_HMAC_SHA2_256/MODP_1024
      tunnel{11}:  INSTALLED, TRANSPORT, reqid 1, ESP SPIs: c72f4e27_i de8fcbc0_o
      tunnel{11}:  AES_CBC_128/HMAC_SHA2_256_128, 0 bytes_i, 0 bytes_o, rekeying in 30 minutes
      tunnel{11}:   1.1.1.2/32 === 1.1.1.1/32
For routing, just issue “ip route” and you’ll see your static or EIGRP routes:
root@james:/snap/bin# ip route
1.1.1.0/30 dev eth1 proto kernel scope link src 1.1.1.2
10.0.0.0/30 dev vti0 proto kernel scope link src 10.0.0.2
172.16.0.0/24 via 10.0.0.1 dev vti0 proto 192 metric 20
192.168.0.0/24 dev eth0 proto kernel scope link src 192.168.0.1
CiscoIOSv15.6(2)T-1
Lots of ways to show what’s going on with an IPsec tunnel on an IOS device, and “show crypto ipsec sa peer” is one of them. I usually use “i” to just include the status:
Router#show crypto ipsec sa peer 1.1.1.2 | i Status
        Status: ACTIVE(ACTIVE)
        Status: ACTIVE(ACTIVE)
        Status: ACTIVE(ACTIVE)
        Status: ACTIVE(ACTIVE)
Also “show ip route” will show your static or EIGRP routes (D for EIGRP):
      1.0.0.0/8 is variably subnetted, 2 subnets, 2 masks
C        1.1.1.0/30 is directly connected, GigabitEthernet0/1
L        1.1.1.1/32 is directly connected, GigabitEthernet0/1
      10.0.0.0/8 is variably subnetted, 2 subnets, 2 masks
C        10.0.0.0/30 is directly connected, Tunnel0
L        10.0.0.1/32 is directly connected, Tunnel0
      172.16.0.0/16 is variably subnetted, 2 subnets, 2 masks
C        172.16.0.0/24 is directly connected, GigabitEthernet0/0
L        172.16.0.1/32 is directly connected, GigabitEthernet0/0
D     192.168.0.0/24 [90/26882560] via 10.0.0.2, 00:07:56, Tunnel0
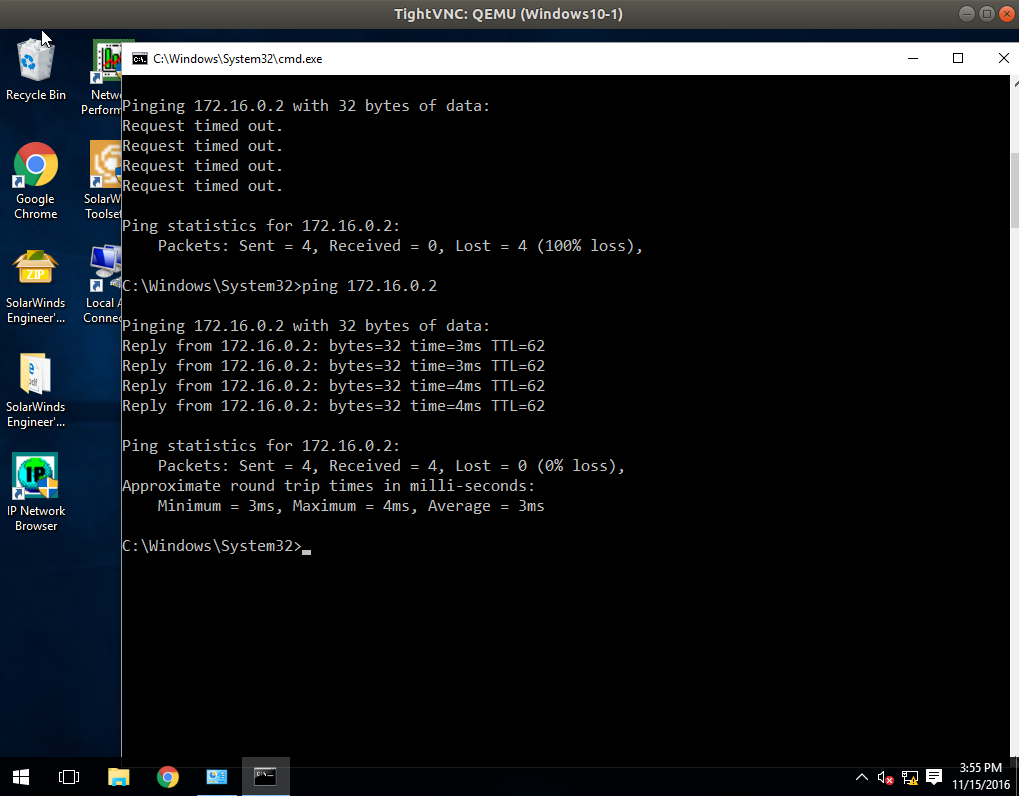
Finally, don’t forget to ping from Windows:
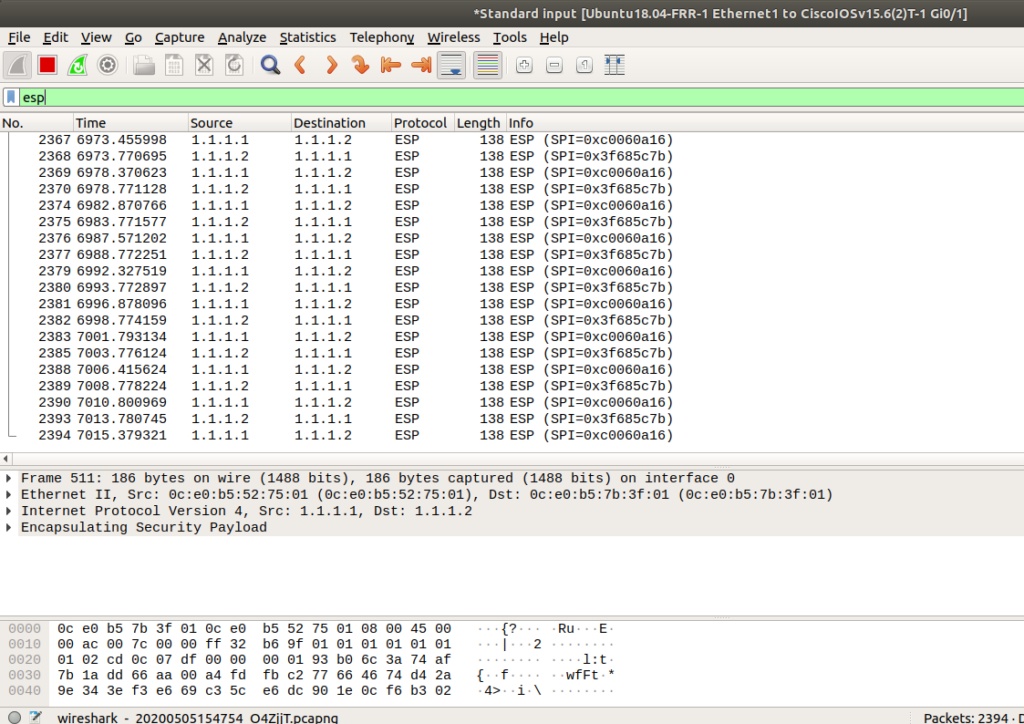
Troubleshooting
There are lots of tools here, including the strongswan “ipsec statusall”, Cisco debug commands, and others. But the one that always let’s me know what’s wrong the fastest is a packet capture. Look for IKE negotiation packets (ISAKMP filter in Wireshark) if you’re tunnel isn’t coming up, and make sure traffic goes through the tunnel (ESP filter in Wireshark) when it’s up: