In a previous post, we took a look at how to install, configure and verify EIGRP with Free Range Routing (FRR) on Ubuntu 22.04. To expand on how to use FRR, let’s investigate installing FRR on another OS (Rocky Linux — a RedHat-like Linux Distro). In addition, I thought it might be a good idea to show how to configure FRR without using the interactive FRR CLI vtysh, which is how we did it in the EIGRP post.
Topology
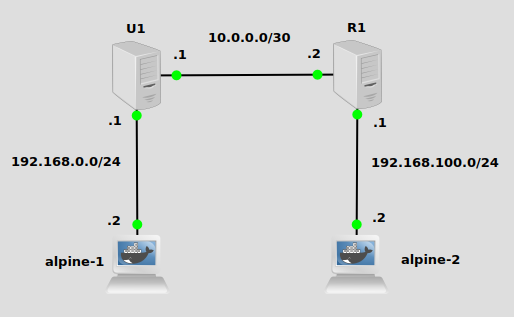
This topology is the same as the previous post on EIGRP I mentioned, except with R1 running Rocky Linux. The objective today will be to make U1 aware of the 192.168.100.0/24 network, and R1 aware of the 192.168.0.0/24 network. I have already configured IP addresses and default routes on alpine-1 and alpine-2 pointing to U1 and R1, respectively. (See this post for installing GNS3 and Docker so you can bring docker containers into GNS3). IP forwarding is also enabled on U1 and R2.
Installation
For Ubuntu 22.04, this script is pulled straight from my last post:
# add GPG key
curl -s https://deb.frrouting.org/frr/keys.asc | sudo apt-key add -
#add respository to apt sources
FRRVER="frr-stable"
echo deb https://deb.frrouting.org/frr $(lsb_release -s -c) $FRRVER | sudo tee -a /etc/apt/sources.list.d/frr.list
# update and install FRR
sudo apt update && sudo apt install frr frr-pythontools
For Rocky Linux 9, this script from the FRR website will work:
#add respository
curl -O https://rpm.frrouting.org/repo/$FRRVER-repo-1-0.el9.noarch.rpm
sudo yum install ./$FRRVER*
# install FRR
sudo yum install frr frr-pythontools
Now that it’s installed, let’s turn on the OSPF daemon. The file to edit on both Ubuntu and Rock Linux are at /etc/frr/daemons. We simply need to change ospfd=no to ospfd=yes. This quick sed command will do it:
sudo sed -i s/ospfd=no/ospfd=yes/g /etc/frr/daemons
Configuration
Instead of using the interactive tool vtysh, we’ll just paste our config into the file /etc/frr/frr.conf which is where commands from vtysh are saved anyway.
This script pasted into the terminal on U1 will work:
echo '
frr version 8.4
frr defaults traditional
hostname u1
log syslog informational
no ipv6 forwarding
service integrated-vtysh-config
!
router ospf
 network 10.0.0.0/30 area 0
 network 192.168.0.0/24 area 0
exit
!
' | tee /etc/frr/frr.conf
For R1, a very similar script with 192.168.0.0/24 switched out for 192.168.100.0/24 will do the trick:
echo '
frr version 8.4
frr defaults traditional
hostname r1
log syslog informational
no ipv6 forwarding
service integrated-vtysh-config
!
router ospf
 network 10.0.0.0/30 area 0
 network 192.168.100.0/24 area 0
exit
!
' | tee /etc/frr/frr.conf
For R1, make sure that you do something about firewalld, if you have a vanilla OS state after installation. It will block ospf packets by default. For production, you can write some very restrictive policies to allow ONLY ospf packets through, or for a test environment, just turn it off:
systemctl stop firewalld
Please firewall responsibly.
Restart FRR on both U1 and R1:
systemctl restart frr
Verification
We should be able to verify that the routes were installed in the main system table using iproute2.
On U1:
ip route show
----

10.0.0.0/30 dev ens4 proto kernel scope link src 10.0.0.1
192.168.0.0/24 dev ens3 proto kernel scope link src 192.168.0.1
192.168.100.0/24 nhid 14 via 10.0.0.2 dev ens4 proto ospf metric 20
On R1:
ip route show
----

10.0.0.0/30 dev ens4 proto kernel scope link src 10.0.0.2
192.168.0.0/24 nhid 16 via 10.0.0.1 dev ens4 proto ospf metric 20
192.168.100.0/24 dev ens3 proto kernel scope link src 192.168.100.1
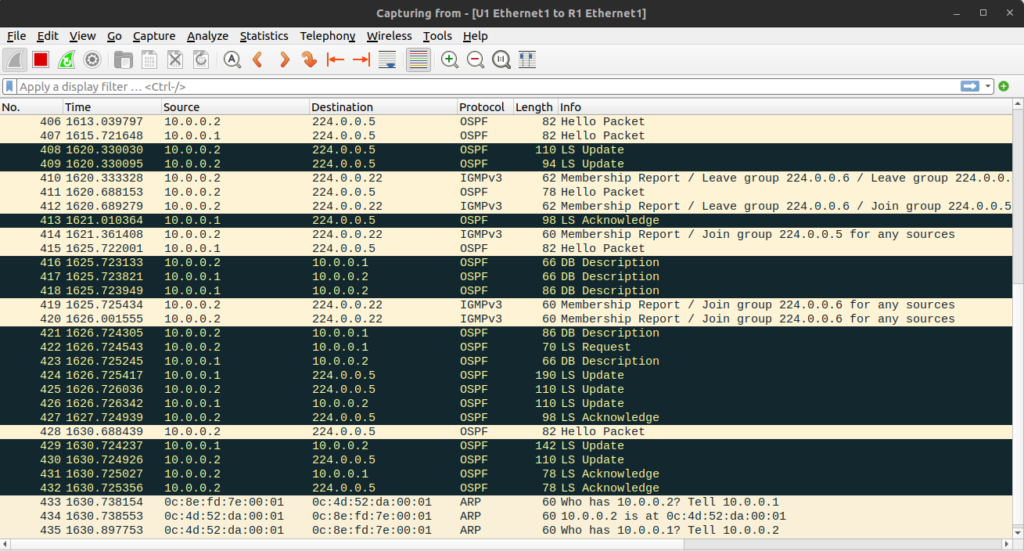
Additionally, a wireshark in GNS3 will show us the entire link-state database exchange as it happens:
For much more information on the state of OSPF, you need to use vtysh. For example, to show neighbor info, we can use the Cisco-like command show ip ospf neighbor (this time on U1):
show ip ospf neighbor
----

Neighbor ID     Pri State           Up Time         Dead Time Address         Interface                        RXmtL RqstL DBsmL
192.168.0.1       1 Full/Backup     10m41s            38.817s 10.0.0.1        ens4:10.0.0.2                        0     0     0
We can see that the neighbor relationship is in the “Full” state, which if you remember from your CCNA studies this is a good thing for OSPF.
Of course, let’s just ping from alpine-1 at 192.168.0.2 to alpine-2 at 192.168.100.2:
ping 192.168.100.2 -c 1
----

PING 192.168.100.2 (192.168.100.2): 56 data bytes
64 bytes from 192.168.100.2: seq=0 ttl=62 time=1.961 ms
It works! Happy routing on Linux!