
Wireguard is an attempt to improve VPN tunnels in a number of ways – simpler code, less compute, easier configuration, the list goes on. If we’re comparing it to IPsec, I would say that yes, it’s a bit easier to configure. One of the main differences is that it does not rely on the classic two IPsec options for keys – PSK and X.509 certificates. Instead, it relies on public key/private key similar to SSH.
Today, we’re going to configure a very simple policy-based site-to-site Wireguard VPN. By “policy-based” I mean that tunneled traffic is determined by a pre-written configuration in the Wireguard configuration file, not by static or dynamic routes. By site-to-site, I mean this is not a remote-access (road warrior) VPN, it’s designed to connect the subnets that sit behind the two VPN peers.
Topology
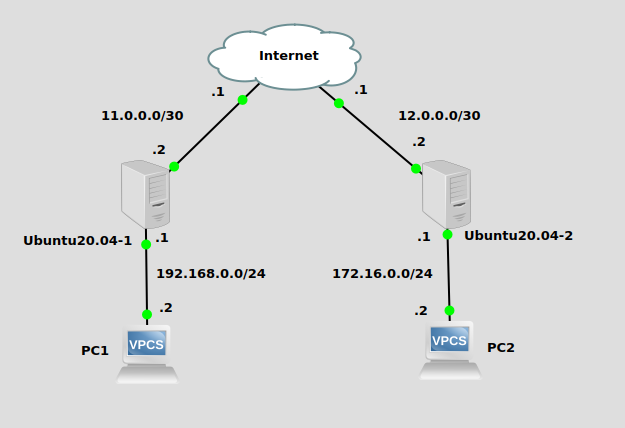
The two Ubuntu20.04 machines are serving as routers and VPN peers. No routing is in place for PC1 and PC2 to talk to each other. While the two Ubuntu machines can connect to each other, there is no network-level encryption. That’s where Wireguard comes in.
Generate key pairs
If you haven’t installed it yet, wireguard can be installed with apt-get:
apt-get install wireguard
We’ll use the wg command to generate keys on Ubuntu20.04-1. These two commands will generate a private and public key pair:
wg genkey > private1.key
wg pubkey < private1.key > public1.key
We’ll do the same on Ubuntu20.04-2
wg genkey > private2.key
wg pubkey < private2.key > public2.key
Tunnel configurations
Then we’ll write a tunnel config file for Ubuntu20.04-1 in /etc/wireguard/wg0.conf:
[Interface]
PrivateKey = uOnrdfW/ANcU+fh+RUjlb3TQlFWIdwbOpDpAA+NkonY=
Address = 10.0.0.1/30
ListenPort = 8888

[Peer]
PublicKey = JjSDqdzjPOX+iIAaWCjxxg1yZ76jAd6jfSfv/1AlojI=
Endpoint = 12.0.0.2:8888
AllowedIPs = 10.0.0.0/30, 172.16.0.0/24
You’ll notice I took the keys out of the key files and pasted them into the config file. Under “Interface” we have Ubuntu20.04-1’s own private key, while the public key of Ubuntu20.04-2 is under “Peer”. The “Address” parameter is the “glue network” of the tunnel. This will be the virtual subnet that exists inside the tunnel encryption. The “AllowedIPs” parameter is where tunneled traffic is specified (interesting traffic). You need to put the destination subnet here. Since this is Ubuntu20.04-1 and 172.16.0.0/24 is the destination on the other side of the tunnel, we put 172.16.0.0/24 as part of the “AllowedIPs” parameter. Also put the glue network in here as well.
We can write a similar one for Ubuntu20.04-2 in /etc/wireguard/wg0.conf. For Ubuntu20.04-2, 192.168.0.0/24 is on the other side of the tunnel so 192.168.0.0/24 will be in “AllowedIPs”. Under “Interface”, we have its own private key, while the public key of Ubuntu20.04-1 is pasted under “Peer”.
[Interface]
PrivateKey = KJgjkPQVhOX5CyYYWr7B6v1AbI7H2kEtBi4wdhAES2g=
Address = 10.0.0.2/30
ListenPort = 8888

[Peer]
PublicKey = +GOlIMgLAnLZujraI8m4F6JyWZOpxWGRAPSUqkwrZyg=
Endpoint = 11.0.0.2:8888
AllowedIPs = 10.0.0.0/30, 192.168.0.0/24
To bring the tunnels up, on each Ubuntu machine run this command:
wg-quick up wg0
To verify the configuration is loaded, use “wg show”. I ran this one from Ubuntu20.04-2:
wg show
---
interface: wg0
  public key: JjSDqdzjPOX+iIAaWCjxxg1yZ76jAd6jfSfv/1AlojI=
  private key: (hidden)
  listening port: 8888

peer: +GOlIMgLAnLZujraI8m4F6JyWZOpxWGRAPSUqkwrZyg=
  endpoint: 11.0.0.2:8888
  allowed ips: 10.0.0.0/30, 192.168.0.0/24
  latest handshake: 28 minutes, 48 seconds ago
  transfer: 1.09 KiB received, 2.63 KiB sent
We should be able to ping the tunnel glue network IPs (here from Ubuntu20.04):
root@u20vm:/home/james# ping 10.0.0.1
PING 10.0.0.1 (10.0.0.1) 56(84) bytes of data.
64 bytes from 10.0.0.1: icmp_seq=1 ttl=64 time=5.22 ms
And PC1 and PC2 can ping each other too:
PC1> ping 172.16.0.2

84 bytes from 172.16.0.2 icmp_seq=1 ttl=62 time=4.942 ms
You’ll notice we did not have to add any routes for 192.168.0.0/24 and 172.16.0.0/24 to be able to reach each other. The Wireguard configuration added routing automatically, which is why I am calling this type of tunnel “policy-based”.
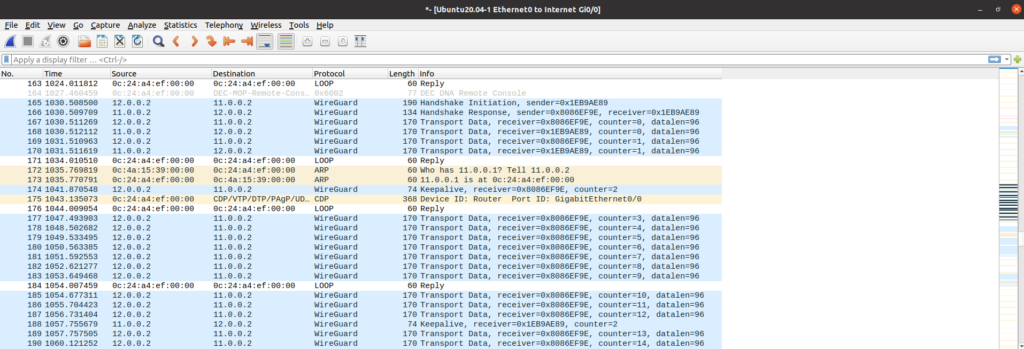
And the most fun part, Wireshark. We can see the traffic going back and forth, and the protocol is labeled “Wireguard”. Pretty cool, right?
Hope you liked this one.