Last time, we installed Nagios Core on Ubuntu Server 20.04. We saw how to add hosts and do a ping check to monitor network connectivity. Today we’ll learn how to check CPU, memory and processes. Nagios provides a free agent to do this that we can install on most standard Linux distributions (Ubuntu, Redhat, Debian, Amazon, etc) as well as Windows and MacOS.
This agent can monitor various services on its host machine, has a REST API and a nice web interface. It replaces the NRPE agent that came before it.
Topology

Same as the previous post, our Ubuntu server at 172.16.0.1/24 will monitor the other two hosts, Rocky Linux and Cisco IOSv. We’ll be installing the NCPA agent on Rocky Linux 8.5 at 172.16.0.2.
Installation
On Rocky Linux 8.5, installation is pretty quick using the official Nagios repository. We’ll add the repository and install the package:
rpm -Uvh https://repo.nagios.com/nagios/8/nagios-repo-8-1.el8.noarch.rpm
yum install ncpa -y
Then we need to allow incoming connections through the firewall on tcp port 5693, which is the default port that NCPA uses:
firewall-cmd --zone=public --add-port=5693/tcp --permanent
firewall-cmd --reload
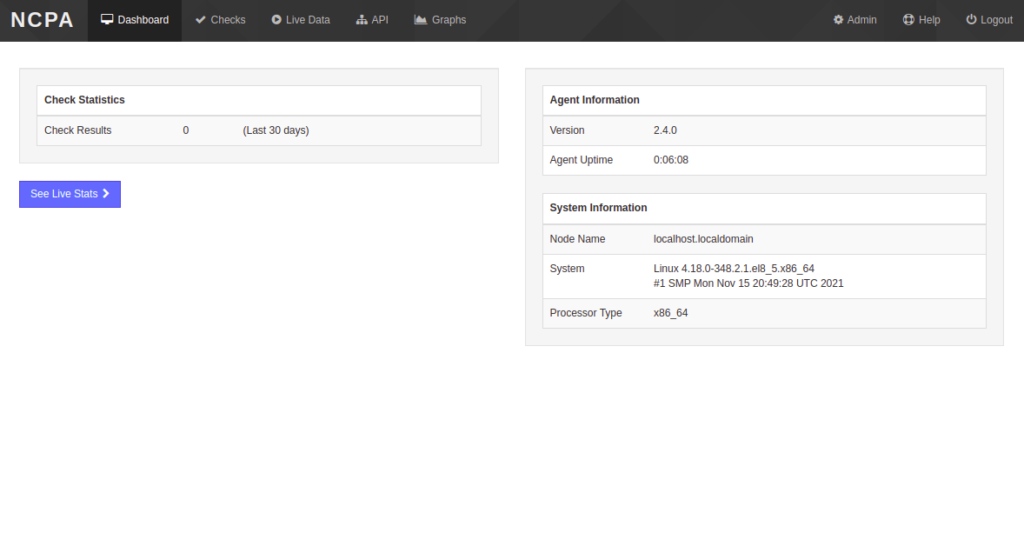
If everything is installed correctly, you should be able to reach the NCPA web interface using the Rocky Linux server’s IP address. Make you use https and port 5693 –> https://<ip address or fqdn>:5693. The default password is “mytoken” which you’ll want to change via the configuration file before putting this in production. But for now it should look like this:

Nagios Core Server Configuration
Heading back to the Ubuntu server where Nagios Core is installed, we’ll configure new services for “rocky” in /usr/local/nagios/etc/objects/hosts.cfg (we configured the host for “rocky” last time). The following script will set up new services to check via the NCPA agent on the Rocky server:
echo "

define service {
    host_name               rocky
    service_description     CPU Usage
    check_command           check_ncpa!-t 'mytoken' -P 5693 -M cpu/percent -w 20 -c 40 -q 'aggregate=avg'
    max_check_attempts      5
    check_interval          5
    retry_interval          1
    check_period            24x7
    notification_interval   60
    notification_period     24x7
    contacts                nagiosadmin
    register                1
}

define service {
    host_name               rocky
    service_description     Memory Usage
    check_command           check_ncpa!-t 'mytoken' -P 5693 -M memory/virtual -w 50 -c 80 -u G
    max_check_attempts      5
    check_interval          5
    retry_interval          1
    check_period            24x7
    notification_interval   60
    notification_period     24x7
    contacts                nagiosadmin
    register                1
}

define service {
    host_name               rocky
    service_description     Process Count
    check_command           check_ncpa!-t 'mytoken' -P 5693 -M processes -w 150 -c 200
    max_check_attempts      5
    check_interval          5
    retry_interval          1
    check_period            24x7
    notification_interval   60
    notification_period     24x7
    contacts                nagiosadmin
    register                1
}

" >> /usr/local/nagios/etc/objects/hosts.cfg
Then we need to download check_ncpa.py from the Nagios github website into /usr/local/nagios/libexec which is the directory where Nagios check scripts go. check_ncpa.py is a script that performs checks on the NCPA agent. This will install it:
wget --no-check-certificate https://raw.githubusercontent.com/NagiosEnterprises/ncpa/master/client/check_ncpa.py -P /usr/local/nagios/libexec/
chmod 755 /usr/local/nagios/libexec/check_ncpa.py #Make accessible and executable
sed -i 's/python/python3/g' /usr/local/nagios/libexec/check_ncpa.py #change 'python' to 'python3'
Then create a command in /usr/local/nagios/etc/objects/commands.cfg that defines the “check_ncpa” command:
echo "

define command {
    command_name    check_ncpa
    command_line    \$USER1\$/check_ncpa.py -H \$HOSTADDRESS\$ \$ARG1\$
}

" >> /usr/local/nagios/etc/objects/commands.cfg
Now reload nagios:
systemctl restart nagios
Remember, if you have any troubles, this command will probably help you out. It’s Nagios Core’s tool to check your config:
/usr/local/nagios/bin/nagios -v /usr/local/nagios/etc/nagios.cfg
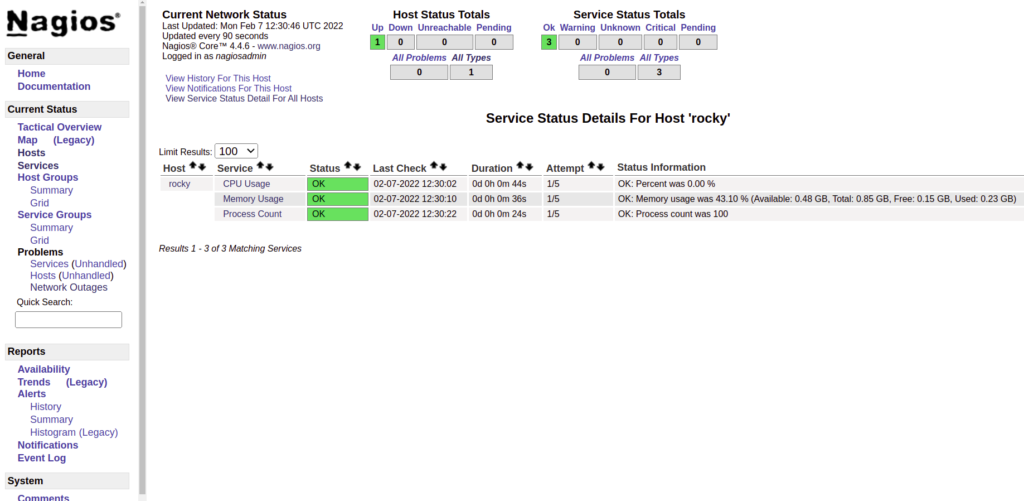
Now that we have the new services loaded, let’s see how they show up in the Nagios web interface.

We should be able to see that “CPU Usage”, “Memory Usage” and “Process Count” are now showing up as services by going to “Hosts” (left nav pane) –> rocky (click on name) –> “View Status Detail For This Host”.
Hope you liked!

