
I posted a while ago on how to install and configure the Bind DNS server on Ubuntu 18.04, and got a request from a reader with help on getting Dockerized Bind into GNS3. This post is the result of my tinkering with that lab.
The organization that oversees the Bind open source project also releases an official Docker image through the Docker hub that anyone can access. Docker container technology can be a tricky at first for systems and network engineers to wrap their heads around. Docker containers are not an entire operating system – full operating systems are designed to run many processes at once. Docker containers are designed to run one process and one process only. They only contain the software and libraries needed to run that process.
GNS3 has a very cool integration with Docker, however. It allows you to add full network adapters to your containers and copies in some handy tools to make the command line environment usable. But since many of the familiar OS tools are not included in most Docker containers like they would be with a standard OS, it can be challenging to get things working right.
If you are using Ubuntu Linux, feel free to check out my guide on installing GNS3 and Docker on Ubuntu 20.04. If you are using Windows or Mac with the GNS3 VM, Docker is already installed on the VM.
Topology
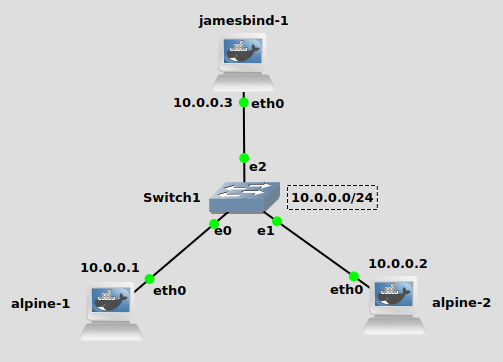
My topology is simple – a single vlan and IP subnet of 10.0.0.0/24. My Bind DNS server will reside at 10.0.0.3, with two Alpine Linux containers at 10.0.0.1 and 10.0.0.2. I walk through getting Alpine Linux containers installed on the post I linked above, if you need help.
Build your own image based off the official ISC Bind image
First open up a shell or terminal on the GNS3 VM or wherever the GNS3 server is located. If you don’t know how to open a shell, they walk you through it on the official GNS3 docs:
https://docs.gns3.com/docs/emulators/create-a-docker-container-for-gns3/
Create a directory where you can write your Dockerfile and build the image:
mkdir jamesbind
cd jamesbind

vi Dockerfile
Feel free to use whatever text editor you like, I’m a vi person. We’re going to write a Dockerfile that looks like this:
FROM internetsystemsconsortium/bind9:9.11
RUN apt-get update
RUN apt-get install vim -y
Basically all this does is pull the official Bind Docker image, and run some commands on the image. Namely we are updating apt-get and installing vi. We need to do this because this docker image does not have a text editor installed, and we have to edit the Bind configuration files.
Full disclosure: there is another, much better way than manually editing config files from inside the container. You can write the config files in the same folder as the Dockerfile, and add them to the Docker image when you build it. However, I think it’s best for learning and troubleshooting purposes to manually edit the text files, so that’s the route I’m going.
Build your image(-t switch gives it a “tag”, which is basically a name):
docker build -t jamesbind .
Don’t forget the period at the end, that’s important. You should now have a fresh docker image with bind and vi installed in it.
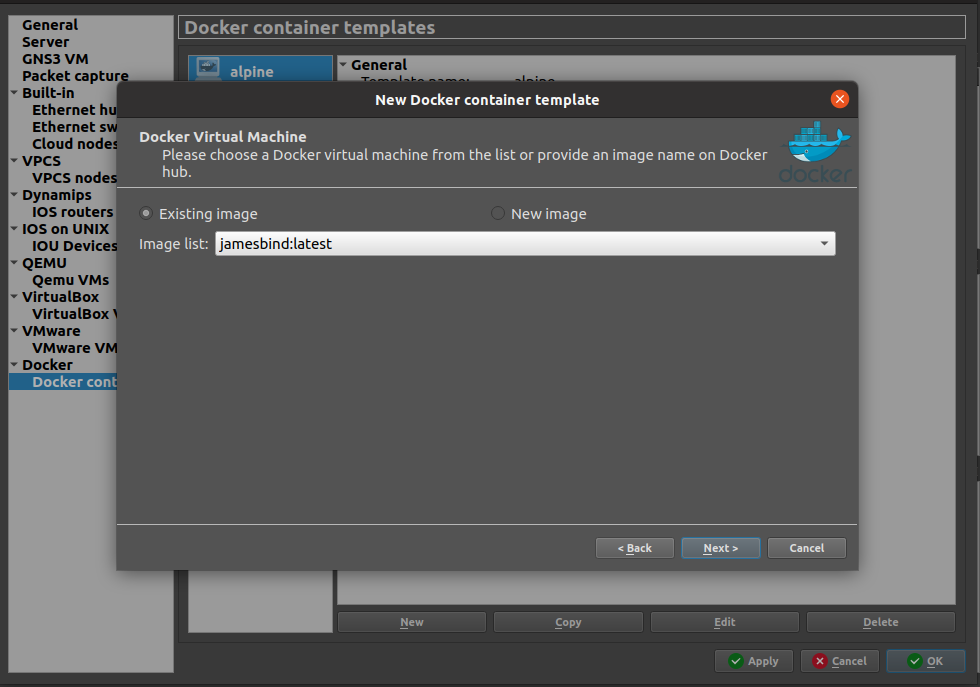
Add your image to GNS3
From the GNS3 preferences window, you can now add your image to the list of devices available.
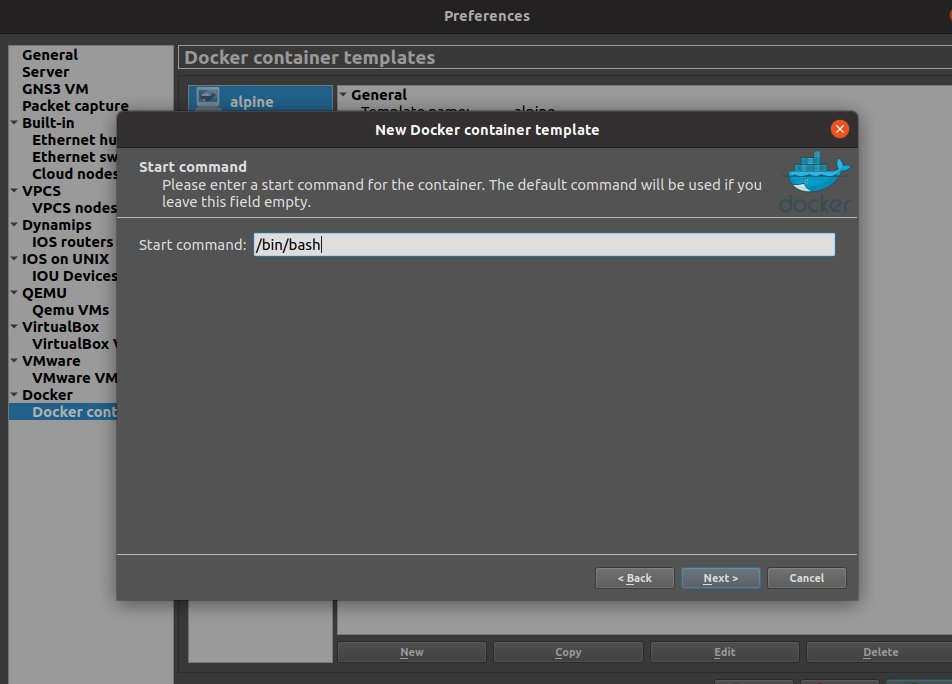
Click through and use the defaults except when you get to the “Start command” window. You’ll want to set that to /bin/bash:
Now you’re ready to use your image in GNS3!
Fire up Bind
Drag all the containers out, connect and double click on them to get a terminal. You should be able to configure IP settings normally using iproute2 commands (ip addr add 10.0.0.1/24 dev eth0, etc). For the Bind container, let’s write our config files. As I mentioned many cycles ago in my Bind server post, there are three Bind config files:
/etc/bind/named.conf.options –> Configures BIND9 options
/etc/bind/named.conf.local –> Sets zone file name and gives its location
/etc/bind/zones/db.jamesmcclay.com –> The actual zone file with DNS records.
First let’s hop into our Bind container (just double click on it) and configure named.conf.options. Mine looks like this:
options {
        directory "/var/cache/bind";
        listen-on { any; };
};
Now on to named.conf.local. This is where you declare your zone. Mine is going to be jamesmcclay.com, I just made it up.
zone "jamesmcclay.com" {
    type master;
    file "/etc/bind/zones/db.jamesmcclay.com";
};
Now for the zone file that we indicated above. It needs to be created, so lets create both the zones folder and jamesmcclay.com zone file:
mkdir zones
cd zones
vi db.jamesmcclay.com
@               IN      SOA     ns.jamesmcclay.com.    root.jamesmcclay.com. (
                                2               ; Serial
                                604800	        ; Refresh
                                86400           ; Retry
                                2419200         ; Expire
                                604800 )        ; Negative Cache TTL
;
@               IN      NS      ns.jamesmcclay.com.
ns              IN      A       10.0.0.3
alpine1         IN      A       10.0.0.1
alpine2         IN      A       10.0.0.2
Finally, fire up Bind by running the “named -g” command. This will run it in the foreground, with debug output which will be handy. Alternatively, you can just run “named” and it’ll go in the background. When you run it, you’ll be looking for a line that says your zone file was loaded. “all zones loaded” seems to be a lie, if there’s errors on your zone, it’ll say that and then say all zones were loaded. Make sure you read the output carefully:
named -g
<...removed for brevity...>
26-Oct-2021 23:49:14.231 zone jamesmcclay.com/IN: loaded serial 2
26-Oct-2021 23:31:49.828 all zones loaded
26-Oct-2021 23:31:49.829 running
In your Alpine containers, add “nameserver 10.0.0.3” to resolv.conf to tell them to use the Bind server for DNS resolution:
echo "nameserver 10.0.0.3" > /etc/resolv.conf
Testing your setup
First let’s ping ns.jamesmcclay.com (the Bind container) from alpine-1:
ping ns.jamesmcclay.com

PING ns.jamesmcclay.com (10.0.0.3): 56 data bytes
64 bytes from 10.0.0.3: seq=0 ttl=64 time=1.080 ms
64 bytes from 10.0.0.3: seq=1 ttl=64 time=1.073 ms
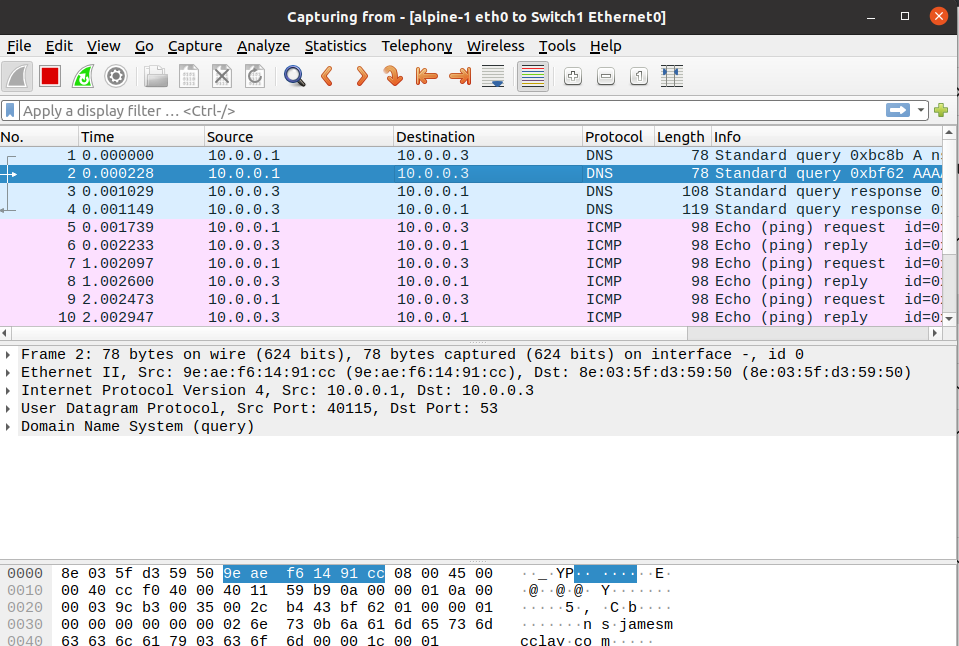
It works! We can see in a wireshark packet capture the DNS request from 10.0.0.1 and response from 10.0.0.3:
Pinging to alpine2.jamesmcclay.com also works:
ping alpine2.jamesmcclay.com

PING alpine2.jamesmcclay.com (10.0.0.2): 56 data bytes
64 bytes from 10.0.0.2: seq=0 ttl=64 time=0.999 ms
64 bytes from 10.0.0.2: seq=1 ttl=64 time=1.087 ms
Troubleshooting
The Bind configuration files are really sensitive to anything that’s left out. Be sure and check to see if you forgot a semicolon or that your zone file is properly formatted with all required entries in place. And again, I highly recommend using the “named -g” when you are testing, it’ll give you some big hints as to what is wrong with your configuration.
If your Bind server is running with no config errors and something still isn’t working, it could be a network issue. Make sure and do a packet capture to see if packets are actually flowing and they’re what you expect! Sometimes after troubleshooting for a long time I do a packet capture only to find packets were never leaving the network interface due to something I forget, like adding an IP address or route somewhere.
Good luck! Feel free to reach out with questions about your lab, I’m always happy to help.